So I am very particular about watches. Not about the looks, mind you. No, I care about their prime function: keeping time. This preoccupation started when I received a Junghans Mega 1 as a birthday gift, back in 1990. This was the first radio controlled wrist watch in the world. It synced itself once a day using radio waves with a transmitter in Frankfurt Germany. This radio transmitter was hooked to an atomic clock. It does not get much more precise than that! Unfortunately it had a couple of downsides. The first being that you had to be within a 1200 km range of Frankfurt, Germany. I live in the Netherlands, so that was in range of the transmitter. But the very first summer I owned the watch I went on vaction to the Bahamas. Alas, that is definitely out of range. When that happens the watch behaves as a 'normal' digital watch, it simply does not sync itself with the atomic reference clock in Frankfurt, Germany. The second downside was more serious. The Mega 1 has a leather strap which incorporates the aerial for radio reception. I happen to perspire a lot. So after a year or so, the leather strap was worn out. I ended up replacing this strap once every year for a couple of years. The cost of this was prohibitive, so I quit wearing the watch.
After that I received another birthday gift in 1998. A Seiko Kinetic Titanium watch. Cool! No more batteries and very allergy and perspiration resistant. I lost the time syncing capability, that was too bad. Another - related - downside of this watch is that it does not have a perpetual calender. Every 30 day month I have to advance the calender one day manually. Not to mention leap years...
So already in 1998 I envisioned the 'Ultimate Watch': It syncs itself to an atomic reference clock anywhere on earth (the fact that it does not work in outer space is acceptable for the time being), it does not need a battery (by using solar or kinetic energy) and the strap is made of Titanium (no perspiration woes for me).
Too bad nobody could make a watch like this forever. Until I saw this March 2012 announcement:
Meet the Seiko Astron GPS solar. Available in selected stores around the World from August 2012.
This wrist watch totally meets all of my requirements except for one. With a recommended consumer price of over 3000 euros it is prohibitively expensive. Oh well, I better start saving...
Once I really do own this watch I foresee another problem. I will need to go to Kathmandu, Nepal and find out if my watch really automatically syncs to official Nepal time, UTC+05:45. Yes that is 5 hours and 45 minutes ahead of Greenwich Mean Time.
On a side note
In the Junghans entry on Wikipedia it is mentioned that Junghans and Seiko are working together on a truly 'global' watch that knows about all the 39 official time zones on Earth. Aha...
Saturday, April 21. 2012
Ultimate Watch Quest over?
Posted by Jos van der Woude
in Technology
at
13:03
| No comments
| No Trackbacks
Defined tags for this entry: Technology
| Top Exits (0)
Sunday, March 25. 2012
Backup DHCP and DNS services in a home network
Summary
Goal: Create both primary and (backup) secondary DHCP and DNS services in a small home network.
Needed: one Linux server, one Windows machine and one DHCP capable router with a telnet interface.
Assumption: some programming experience.
Contra indication: not necessary when two Linux servers are available.
Alternative option: Dual DHCP DNS server, sourceforge.net/projects/dhcp-dns-server/files/.
Note: IP addresses, domain names, user names and passwords used here, do not reflect the actual setup.
Overview
My home network consists of one server running Linux, a number of wired clients running on Microsoft or Apple operating systems and an seemingly ever growing number of wireless clients running on a variety of platforms. The network infrastructure consists of a managed switch, a dual WAN router with wireless AP, a separate second wireless AP, a cable modem and a ADSL modem. The server is running both ISC DHCPD and ISC Bind providing crucial DHCP and DNS service to clients in the network.
The goal is to design the network in such a way that when the server is down (for whatever reason) Internet service to known clients is not interrupted. Specifically, known clients are still able to receive DHCP leases and resolve private domain names to IP addresses and vice versa. Obviously other services the server may provide, e.g. smb shares, are interrupted.
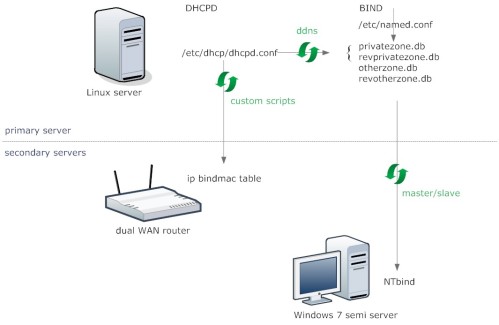
To achieve the stated goal it is necessary to have secondary DHCP and DNS services in case the primary services on the Linux server fail. Figure 1 outlines the design.
Figure 1 DHCP and DNS services and their backups
Read whole article for the details of the setup.
Posted by Jos van der Woude
in Geeky stuff
at
09:21
| 3 Comments
| No Trackbacks
Defined tags for this entry: geeky stuff
| Top Exits (0)
Thursday, August 25. 2011
Installing The Link Layer Topology Discovery (LLTD) Protocol Responder For Linux
How to make your Linux server appear on the Windows Vista/7 network map like in the picture below.
It is easy to find info on the net on how to install the lld2d responder on a linux server. However, if the Microsoft provided Sample Code is used as is, your linux box is represented as a wireless AP/switch on the map. This is so because in the sample code information is encoded that defines the machine as a wireless AP/switch. You must change this to reflect the fact that your linux box is wired and not a multifunction switch/bridge. This is not hard to do, see the instructions below. For the details you have to read the protocol specification at: Link Layer Topology Discovery Protocol. Not to worry, this is only for the die-hards ...
1. Get the Rally-LLTD-PortingKit.exe. Unpack and copy folder to a suitable directory on your Linux server. cd to the Sample Code directory
2. Add the line: #include <limits.h> to src/state.c just after the line #include <assert.h>
3. Edit the file src/osl-linux.c . Make all TLV get-functions relating to wireless/multifunction devices return a simple constant: TLV_GET_FAILED. The functions you must edit are those with the numbers: 5,6,8,9,A,D,14,15,19 and 1A. Do not touch any of the other functions. THIS IS THE CRUCIAL STEP.
4. cd to the native-linux directory and run make. Install the resulting executable lld2d to /usr/sbin
5. Use an icon editor to make a Windows 48x48 pixel icon of your choice. I have used tux, obviously. Copy this *.ico file to /etc on your server.
6. Edit lld2d.conf to set proper path and name for your own icon
7. Copy lld2d.conf to /etc also
8. Run /usr/sbin/lld2d eth0. If necessary replace eth0 with your own ethernet device
9. Optionally create an init script.
10. Generate a new network map in Windows 7/Vista and watch the results in awe ...
Have fun!
It is easy to find info on the net on how to install the lld2d responder on a linux server. However, if the Microsoft provided Sample Code is used as is, your linux box is represented as a wireless AP/switch on the map. This is so because in the sample code information is encoded that defines the machine as a wireless AP/switch. You must change this to reflect the fact that your linux box is wired and not a multifunction switch/bridge. This is not hard to do, see the instructions below. For the details you have to read the protocol specification at: Link Layer Topology Discovery Protocol. Not to worry, this is only for the die-hards ...
Instructions
1. Get the Rally-LLTD-PortingKit.exe. Unpack and copy folder to a suitable directory on your Linux server. cd to the Sample Code directory
2. Add the line: #include <limits.h> to src/state.c just after the line #include <assert.h>
3. Edit the file src/osl-linux.c . Make all TLV get-functions relating to wireless/multifunction devices return a simple constant: TLV_GET_FAILED. The functions you must edit are those with the numbers: 5,6,8,9,A,D,14,15,19 and 1A. Do not touch any of the other functions. THIS IS THE CRUCIAL STEP.
4. cd to the native-linux directory and run make. Install the resulting executable lld2d to /usr/sbin
5. Use an icon editor to make a Windows 48x48 pixel icon of your choice. I have used tux, obviously. Copy this *.ico file to /etc on your server.
6. Edit lld2d.conf to set proper path and name for your own icon
7. Copy lld2d.conf to /etc also
8. Run /usr/sbin/lld2d eth0. If necessary replace eth0 with your own ethernet device
9. Optionally create an init script.
10. Generate a new network map in Windows 7/Vista and watch the results in awe ...
Have fun!
Posted by Jos van der Woude
in Geeky stuff
at
09:17
| 1 Comment
| No Trackbacks
Defined tags for this entry: geeky stuff
| Top Exits (0)
(Page 1 of 1, totaling 3 entries)